What is bleed, trim and safe area?
What is bleed?
Does your artwork contain images, text or graphics that extend to the very edge of the finished piece? This is called "bleeding off the edge" or simply "bleed". Files with bleed need to be built to the final trim size plus 1/8" extra on each side for the bleed. Example, if you are ordering an 8.5" x 11" sell sheet, the graphic file's size should 8.75" x 11.25". When saving the file into the proper format (preferably PDF), do not use any crop or printer's marks. These will increase the dimensions of the file.
Bleed refers to a background colour, graphic, or image that extends to the edge of the finished paper size and beyond. It's difficult for printing equipment to apply ink up to the cut edge of a sheet of paper. So an extra .125" (3mm) margin is typically added on each side of the design, enabling the background colour, graphic, or image to extend past (i.e., "bleed off") the paper's final trim edge. This extra bleed area will be cut off the printed sheet. For example, a letterhead sheet that incorporates bleed in its design will be 8.75" x 11.25" before being trimmed to a finished size of 8.5" x 11".
In contrast, a piece with no bleed keeps all the printed elements a minimum of .125" (3mm) away from the edge of the paper on all four sides. Nothing is printed to the finished edge of the paper.
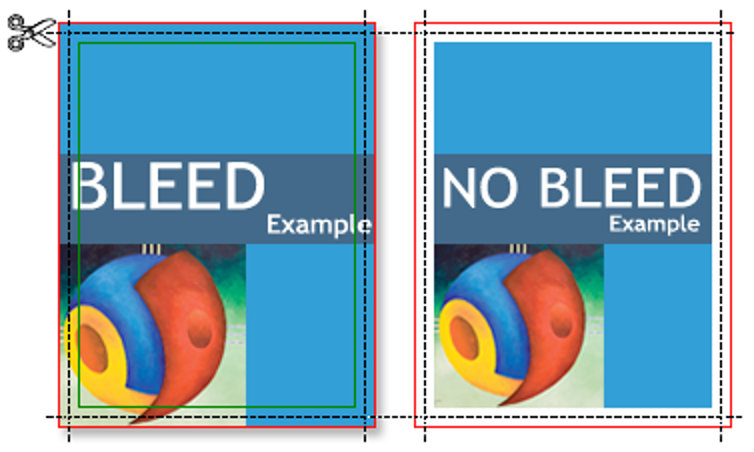
Bleed vs. No Bleed
The illustration below shows two pages. The one on the left is a page printed with bleed, before trimming. When trimmed, the finished piece will have colour or graphic content extending to the finished, cut edge on all four sides.
The one on the right shows a page designed without any bleed. When trimmed, the finished piece will have an unprinted border on all four sides.
What is the trim edge?
A sheet with bleed is larger than its finished size. The "trim edge" refers to each edge of the sheet after it has been cut to its finished size. Any printed elements that extend beyond the trim edge will be cut off in the process of reducing the paper to its finished size.
What is the safety zone?
To avoid being trimmed off, text and other important matter must stay within a "safety zone" that is is a minimum of .125" (3mm) away from the trim edge. Any design elements that extend beyond the safety zone risk being cut off in the process of trimming the paper to its finished size. For example, the safety zone for an 8.5" x 11" letterhead would be .125" smaller on each side, or 8.25" x 10.75".
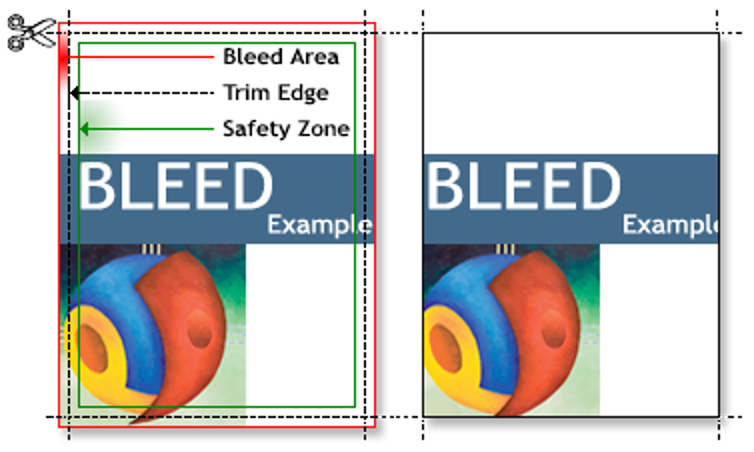
Bleed Before and After Trimming
The illustrations below shows two pages. The one on the left shows a document designed with bleed (finished size plus an extra .125" (3mm) on each side). Because minor variations can occur when cutting the paper to its finished size, text and other important elements must stay .125" (3mm) away from the trim edge to avoid being trimmed off.
The illustration on the right shows the printed piece after trimming. Note the last "e" in "Example" has been cut in half because it extended past the safety zone and into the trimming area. Some of the artwork has been cut off for the same reason. Any elements that extend past the safety zone risk being lost in the process of trimming the paper to its finished size.
How do I create bleed in my design?
To create bleed in your design, simply make sure the background colour, graphic, or image you want it to bleed extends off the final trim edge of the page by .125" (3mm).
If you are creating your file in an application such as Photoshop, you must make your document height and width dimensions .25" (6mm) larger than your final trim size. For example, if the finished size is 8.5" x 11" then make your document 8.75" x11.25". Position guides that are .125" from each edge. For design purposes, these guides will represent where the paper (and any of your design elements) will be cut.
Position any background colour, graphic, or image that you want to bleed so they extended past your guides, all the way to the outside edge of the document. Remember, the extra .125" will be cut off after your piece is printed.
What is the preferred file format for Impactica?
These are the formats we recommend:
-For graphics or text: print-ready, vector based PDFs
-For a mix of graphics and images: print-ready PDFs
If you send us Microsoft Word or Microsoft Publisher files, we will attempt to open them and convert the files to a PDF.
Saving your pdf with the right settings eliminates lots of potential problems that can occur with color and fonts used in a document. Open the file ( the .ai or .psd file) in the respective program click "File>Save As "Select "Adobe PDF" as the file format. The "Adobe PDF Preset" menu will pop up. Select [PDF/X-1a:2001] from the drop down click "Save PDF". Alternatively, you may choose to outline your text instead. This is best-achieved using Illustrator or Photoshop.
A note about the use of borders in your print design.
Does you piece contain a graphic or artistic border close to the paper edge? When paper is trimmed there is a cutting tolerance of 1/16" which may result in uneven borders. For this reason we do not recommend borders. However, if they are necessary in your piece, the border should be at least 1/4" thick and at least 3/8" from the bleed line. Perfect trimming is not guaranteed.
Incorporating Process Metallic Ink in your files.
At Impactica, you can add an unlimited array of metallic colours to your prints by taking advantage of our ElectroInk Metallic Ink Process. You will need to set up your files properly in your design program by referencing our metallic colours, using our FREE metallic swatch book.
Request your free Metallic Swatch Book and Metallic Instruction Guide by contacting our Orderdesk by either phone or email.
Impactica Orderdesk: Phone: 1-888-433-9794. Email: orderdesk@impactica.ca
Incorporating White Ink in your files.
Incorporating white ink into your artwork is a great way achieve enhanced colours, on kraft, metalized, coloured, or clear substrates. Alternatively, you may just want to print bright white on dark coloured stocks for a unique design effect. Either way you go, adding white to your artwork requires a few special steps for print success. See our WHITE INK SETUP GUIDE here.
I designed my files but I’m not sure if I did it right for printing?
If you're unsure if your file is printable, send it to us and we'll examine them free of charge. With every order our experts give your file a 8-point inspection. We will check your file for print-related technical errors and let you know if there is anything that will prevent us from printing your job. If there's a problem, we'll email you with what the problem is and help you fix and revise your files.
*Submitting files that are not print ready, or do not follow our proposed guidelines may delay your order by a day or more.
I created my files in a program other than the ones indicated on your site. What should I do?
If you've created your artwork in consumer design programs such as Corel Draw, PageMaker, Microsoft Publisher, Microsoft Word, PowerPoint, ect. you can attempt to use them if they allow you to create a PDF from the native file. You can also use Acrobat Distiller with a wide range of programs to create PDF files that will increase your chances of producing a print-ready file.
If you're unsure if your file is printable, send it to us and we'll examine them free of charge. With every order our experts give your file a 8-point inspection. We will check your file for print-related technical errors and let you know if there is anything that will prevent us from printing your job. If there's a problem, we'll email you with what the problem is and help you fix and revise your files.
*Submitting files that are not print ready, or do not follow our proposed guidelines may delay your order by a day or more.
My image is 72 dpi, is that ok?
NO. Most web graphics are 72 dpi which is not a problem when viewed on a monitor. For printing, the files that you submit must be 300 dpi, at final size, to ensure maximum sharpness and quality. Failure to do so may result in blurriness (pixelation).
Computers cannot add new data to sharpen the image, they can only add "filler" pixels. This usually always results in blurry and muddy images. If your original file was created at anything less than 300 dpi, it IS NOT acceptable to simply go and manually change the resolution to 300 dpi after the files have been created. Your files or images must be either recreated at 300 dpi. Please remember that the image or file needs to be 300 dpi at FINAL SIZE. So if an image is 4"x4" at 300 dpi and then placed in a page layout program and blown up 200% to 8"x8", the resolution now is only 150 dpi.
What resolution should my files be?
Image files (bitmap files) are made up of pixels, tiny rosettes of colour. To ensure your images print clear & crisp your images need to contain a certain number of pixels per inch. For print the standard is 300 dpi (dots per inch) resolution. Using images under this can cause the printed image to look pixelated or grainy. Images shown on computer screens can be much lower resolution to appear crisp and clear so just because it looks good on the screen does not mean it will always turn out clear. You can find out the resolution of an images in Photoshop by clicking the Image menu and then selecting Image size.
Do you accept Microsoft Word or Publisher files?
If you send us Microsoft Word or Microsoft Publisher files, we will attempt to open them and convert the files to a PDF.
If you've created your artwork in consumer design programs such as Corel Draw, PageMaker, Microsoft Publisher, Microsoft Word, PowerPoint, etc. you can attempt to use them if they allow you to create a PDF from the native file. You can also use Acrobat Distiller with a wide range of programs to create PDF files that will increase your chances of producing a print-ready file.
If you're unsure if your file is printable, send it to us and we'll examine them free of charge. With every order our experts give your file a 8-point inspection. We will check your file for print-related technical errors and let you know if there is anything that will prevent us from printing your job. If there's a problem, we'll email you with what the problem is and help you fix and revise your files.
*Submitting files that are not print ready, or do not follow our proposed guidelines may delay your order by a day or more.
Metallic foiled text, spot coating, or other small elements.
Any thin elements to be foiled or spot gloss coated must to be outlined or converted to a shape.
When using spot gloss coating or foil on text ensure you use at least 10 pt text. Thin text or shapes can have problems when being foiled or spot coated. For crisp results, larger areas work best. Anything to be foiled or spot coated needs to be a vector shape in a separate layer that is 100% black.
How to Convert text to Shape in Adobe Photoshop.
Without converting text to a shape, problems can occur with fonts when file are sent to print. The computers receiving the file may not have the font that the document was designed with and will make a substitution font on its own.
To convert text to shape in your file:
Once you have your text exactly right, select the “Text” layer then in the top menu bar select “Type” and then select “Rasterize Type”.
That’s it, that will change the words from editable text to a shape that won’t change when you send it in.
How to Outline Text in Adobe Illustrator.
When creating PDF’s in Illustrator, outlining the text ensures that the carefully chosen typefaces used in your documents come out looking like they should.
If text isn’t outlined, fonts can change once you send them.
Once the text in a document is exactly as you want it, right click on the text box, and select “outline text”. This changes the words into vector shapes that will work perfectly when you send them. You cannot edit the text once you have outlined it so make sure it is correct or you will have to retype it.
Make sure your file dimensions (aka the art board) are set to the same dimensions as the product you are purchasing. For instance, if you purchase a 4" x 6" postcard, we will need artwork that is 4" x 6". We cannot resize your artwork that is a different dimension without distorting or altering it. NOTE: If your design has BLEED see this excerpt.